I managed to get a couple more hummingbird videos I thought I'd upload for you. The first is of two feeders on our back deck. Imagine, behind me there are three more feeders with the same level of activity (if I turn around to film those, the birds would fly away). The second video is shot through our kitchen window, so you see a screen. Still amazing, though, to watch these birds!
Sunday, August 21, 2011
Monday, August 15, 2011
Kool Aid: It's Not Just for Kids!!!
I think grocery-store cashiers are trained to be friendly while simultaneously directed to not judge, assume, or otherwise question what a customer buys in their store. Imagine the combination of things one can buy--and generally you see the cashier simply smile, or maybe initiate a friendly encounter by saying things like "oh, looks like chili tonight," or "yum...pie...when should I show up?"
So when I plopped down 60 Kool-Aid and a few Klaas drink mix packets (on sale 5 for $1.00) in a large store in Tucson a few years ago, I kept a close watch on the cashier. I figured there would no doubt be a range of expressions, from "What the h....?" to "could this have something to do with DRUGS, and am I selling DRUG material to this crazy WOMAN who will sell cherry, grape, and lime-flavored METH to my KID and ruin my LIFE?????" I was right. After letting her stew a bit, I handed her my $12 and change and said in a genuinely friendly tone "I'm not doing anything illegal." She finally said "I give. What ARE you doing with 60 packets of Kool-Aid?" (We had plenty of time to talk since she had to scan each one separately; I couldn't go through the "15 Items And Under" line). "Well," I explained, "I'm dyeing yarn."
Which of course prompted a whole 'nother series of questions, which will all be explained below. I finished my transaction with the cashier who no doubt will have a little nugget of a story to tell her family that night, and almost did a jig on my way out. I really scored at that store. In Pinetop, I'm lucky if I can find lime (green) KoolAid ("KA" for those in the yarn-dyeing biz), I'm generally stuck with grape (a weird purple), lemonade (light yellow) and a couple different reds. But here I found Pina-Pineapple (a lovely gold); lime (green), Berry Blue (a sky blue), Ice Berry Lemonade (a darker blue), and I even found Klaas mixes in the Hispanic Food aisle: Mango (a lovely rich orange), Jamaica (a light red-pink), and Tamarindo (brown, a major coup; that helps tone down the bright pastels of most of the other colors).
The discovery that you can dye your own yarn is one of those things that happens to a knitter; it's like graduating from high-school, going to college, and finding out another world exists. You can design your own colors, set your own stage for the product you'll be knitting next--the world now has endless possibilities, as long as you can score some great KA flavors. You can set up your yarn to dye it in long stripes, blend colors together, create different tones of the same color, or just experiment with different yarns and color combinations. Best of all, you can take bland, boring yarn of a myriad of neutral colors that you may find cheaply at thrift stores or on sale, and change it into something spectacular.
OK, I'll start with the "before" and "after" so you get my drift. This past weekend, I was in New Mexico with three of my crafty friends, Pam, Jeanne, and Beth, and Saturday was our KA Dyeing Extravaganza. We started with yarns like these:
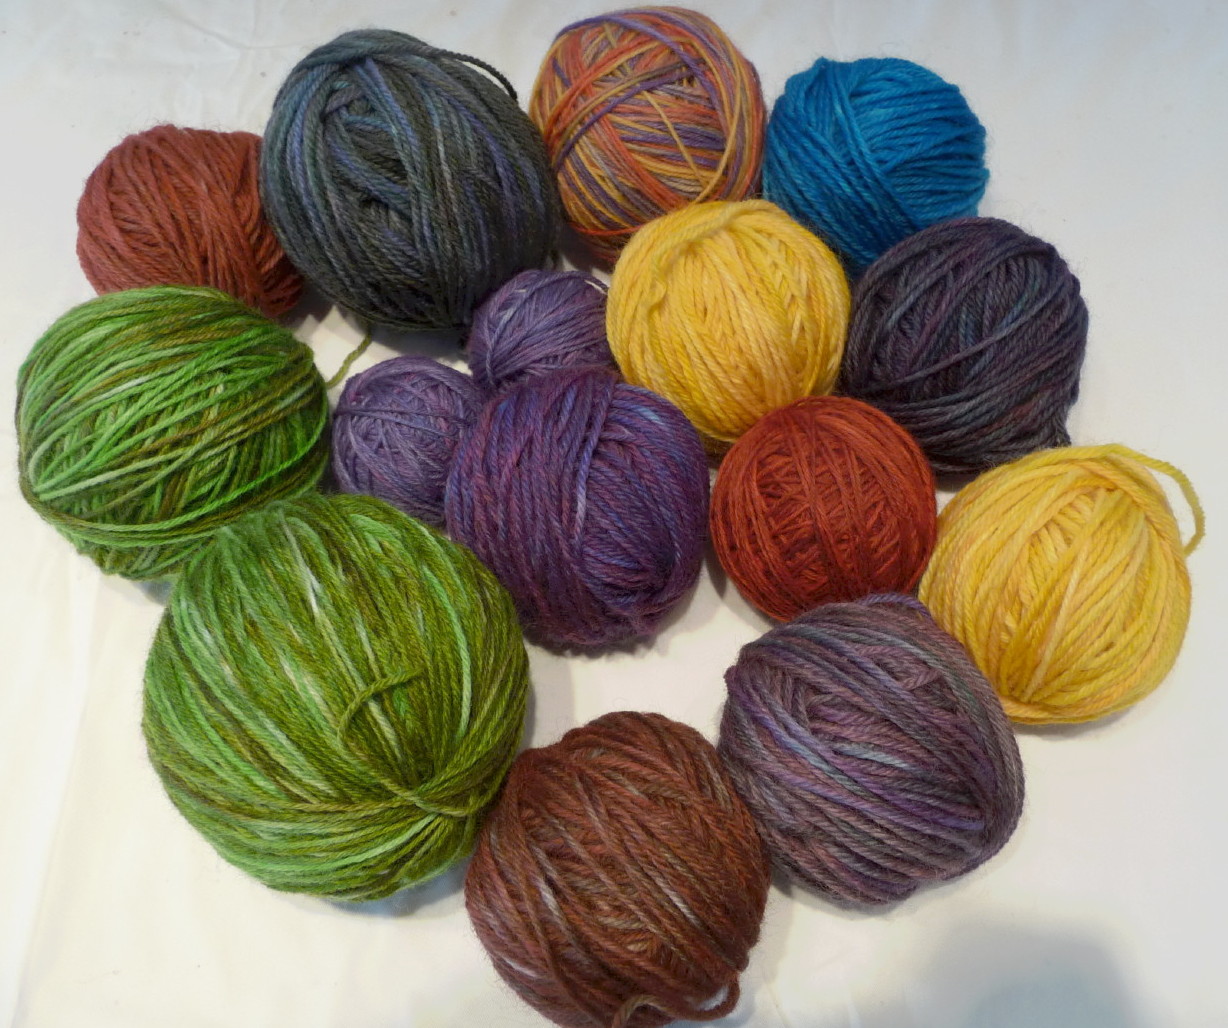
And ended up with this rainbow:

The best thing is that these dye-jobs are colorfast, permanent, and will not fade. If you do it right, that is. The other great thing is that you don't need special equipment; it's just KA. You can use your microwave, pans, crockpot, and utensils, without having to worry about strange chemicals contaminating your food containers. You only need to understand a few key concepts:
1. Why KoolAid? It's the combination of dye (i.e. Red Dye #3) and citric acid. You need the dye/color and some sort of acid base.
2. You need to use protein-based yarn, i.e. wool, angora, alpaca. Any yarn that originates from animals. A blend would work (i.e. acrylic/wool), but the dye won't take as deeply. Nylon-based yarn works as well for some odd reason, but other yarns like cotton, pure acrylic, rayon, etc. won't take the dye. You may "stain" such yarn, but, like if you spill coffee on your t-shirt, it is a stain that will eventually fade over multiple washings. If you've ever dyed Easter eggs, it's the same phenomenon. Protein egg shell, dye, and vinegar. By the way, those Paas egg dye tablets work as well (buy them on sale after Easter!).
3. You need heat. The dye will only form a permanent bond to the proper yarn with a heat-induced reaction between the protein in the yarn and the acid in the dye.
4. Never fear, if you don't have KA or some other powdered drink mix (preferably unsweetened, with dye and citric acid), you can use food coloring, cake-icing colors, or other dye-based products with some sort of acid (i.e. vinegar, a common addition; or plain citric acid you can buy at health food stores or with canning supplies).
First, you prepare your yarn by figuring out just what you want to do with it, but in general, you wind it in a loop. Here, Pam is winding yarn around two chairs:

Then, you take some undyeable yarn like cotton, and make little ties around your loop about every 8-12 inches or so, so the action of dyeing, heating, stirring, and general movement of your yarn throughout the process doesn't get it all knotted up. Then, stick your yarn in the sink with some lukewarm water and let it soak thoroughly.
Now, you mix up your dyes. Put on rubber gloves, please. Cover your counters with old shower curtain liners or other plastic. You can use baking soda to clean up, but it just helps to protect everything. Keep plenty of paper towels handy. I use plastic 16-oz water/iced-tea bottles. You want these to be highly concentrated with dye. Even though KA has citric acid already in it, I tend to add a little vinegar (about a 1/4-cup) to the bottle, pour in at least two, if not more, packets of KA in your preferred color, and fill about 2/3 with water. If you want more depth to your color (for example, Lemonade flavor is a very light yellow), add some drops of food color. Sometimes, I'll add a different food color to make a different color--I can add some red food color drops to pink lemonade, making it a strong, deep pink, and then mix in some orange KA to make a sort of coral/salmon color. Brown (Klaas tamarindo) is added to Berry Blue to make a nice teal. Berry Blue and Limeade make a nice aqua. Etc. etc. The point is to play and have fun making your concentrated colors. Cake icing (Wilton's brand, found at most craft stores) comes in a myriad of colors not found in KA: burgundy, copper, black, lavender, moss green, mauve, etc. For Wilton's icing dyes, I take a small jar, put in a teaspoon of gooey gel that is the icing dye, add hot water, replace the lid and shake up until it's completely dissolved, then pour it in a plastic water bottle, and add my vinegar/citric acid, and water.
You end up with multiple colors:
The yarn gets pulled out of the sink, squeezed out, and placed in either microwaveable Pyrex dishes and jars, or in a crockpot. There are other ways to dye, but I'll just show you what we did.

Slowly pour your colors into your jars, crock pot, dish, whatever. If you want multiple colors for one yarn, or, in the case of the green-colored yarn below, a mix of the same family of hues, carefully pour your dye in sections, pressing each color into your yarn until it is saturated, and then add your other color in a different section.
And now it's time to cook. For the crock-pot yarn, I just set it on low and forgot about it for an hour or so. For yarn that will go in the microwave, I heat it up for a couple minutes, take it out, let it sit for a few minutes, re-heat it, and so on. You don't want the water to boil or even simmer, you want it heated just below a simmer. Keep heating/cooling, and minimize your stirring. You can poke the yarn around with a spoon to make sure the dye is distributed consistently. You eventually want to see the water turn clear.
To show you what happens before and after cooking, here is another example. The highly-concentrated dye liquid starts out dark, with your color. To this I would add my yarn:

Magic. The dye reacts with the acid and bonds with the protein in the yarn. The water goes from a deep color to CLEAR. Absolutely clear. I didn't get a great shot of clear water, but this one is close:

You can see the yarn that has been colored from that red. When the water is clear, you're basically done. Let the yarn cool, rinse it out in lukewarm water, squeeze gently, and let dry. The great thing about dyeing at home in Arizona or where I was in New Mexico this weekend is that the yarn dries fast in the sun.
After the yarn is completely dry, wind it into balls, and you're ready to go!!!


The next dilemma is what to knit with these new lovelies. Shawls? Scarves? Hats? The possibilities are endless. Right now, I just like to look, squeeze and squish, and remember a great weekend where color was the name of the game.

So when I plopped down 60 Kool-Aid and a few Klaas drink mix packets (on sale 5 for $1.00) in a large store in Tucson a few years ago, I kept a close watch on the cashier. I figured there would no doubt be a range of expressions, from "What the h....?" to "could this have something to do with DRUGS, and am I selling DRUG material to this crazy WOMAN who will sell cherry, grape, and lime-flavored METH to my KID and ruin my LIFE?????" I was right. After letting her stew a bit, I handed her my $12 and change and said in a genuinely friendly tone "I'm not doing anything illegal." She finally said "I give. What ARE you doing with 60 packets of Kool-Aid?" (We had plenty of time to talk since she had to scan each one separately; I couldn't go through the "15 Items And Under" line). "Well," I explained, "I'm dyeing yarn."
Which of course prompted a whole 'nother series of questions, which will all be explained below. I finished my transaction with the cashier who no doubt will have a little nugget of a story to tell her family that night, and almost did a jig on my way out. I really scored at that store. In Pinetop, I'm lucky if I can find lime (green) KoolAid ("KA" for those in the yarn-dyeing biz), I'm generally stuck with grape (a weird purple), lemonade (light yellow) and a couple different reds. But here I found Pina-Pineapple (a lovely gold); lime (green), Berry Blue (a sky blue), Ice Berry Lemonade (a darker blue), and I even found Klaas mixes in the Hispanic Food aisle: Mango (a lovely rich orange), Jamaica (a light red-pink), and Tamarindo (brown, a major coup; that helps tone down the bright pastels of most of the other colors).
The discovery that you can dye your own yarn is one of those things that happens to a knitter; it's like graduating from high-school, going to college, and finding out another world exists. You can design your own colors, set your own stage for the product you'll be knitting next--the world now has endless possibilities, as long as you can score some great KA flavors. You can set up your yarn to dye it in long stripes, blend colors together, create different tones of the same color, or just experiment with different yarns and color combinations. Best of all, you can take bland, boring yarn of a myriad of neutral colors that you may find cheaply at thrift stores or on sale, and change it into something spectacular.
OK, I'll start with the "before" and "after" so you get my drift. This past weekend, I was in New Mexico with three of my crafty friends, Pam, Jeanne, and Beth, and Saturday was our KA Dyeing Extravaganza. We started with yarns like these:
 |
| Gray, brown, and off-white yarns waiting for a new lease on life |
And ended up with this rainbow:

The best thing is that these dye-jobs are colorfast, permanent, and will not fade. If you do it right, that is. The other great thing is that you don't need special equipment; it's just KA. You can use your microwave, pans, crockpot, and utensils, without having to worry about strange chemicals contaminating your food containers. You only need to understand a few key concepts:
1. Why KoolAid? It's the combination of dye (i.e. Red Dye #3) and citric acid. You need the dye/color and some sort of acid base.
2. You need to use protein-based yarn, i.e. wool, angora, alpaca. Any yarn that originates from animals. A blend would work (i.e. acrylic/wool), but the dye won't take as deeply. Nylon-based yarn works as well for some odd reason, but other yarns like cotton, pure acrylic, rayon, etc. won't take the dye. You may "stain" such yarn, but, like if you spill coffee on your t-shirt, it is a stain that will eventually fade over multiple washings. If you've ever dyed Easter eggs, it's the same phenomenon. Protein egg shell, dye, and vinegar. By the way, those Paas egg dye tablets work as well (buy them on sale after Easter!).
3. You need heat. The dye will only form a permanent bond to the proper yarn with a heat-induced reaction between the protein in the yarn and the acid in the dye.
4. Never fear, if you don't have KA or some other powdered drink mix (preferably unsweetened, with dye and citric acid), you can use food coloring, cake-icing colors, or other dye-based products with some sort of acid (i.e. vinegar, a common addition; or plain citric acid you can buy at health food stores or with canning supplies).
First, you prepare your yarn by figuring out just what you want to do with it, but in general, you wind it in a loop. Here, Pam is winding yarn around two chairs:

Then, you take some undyeable yarn like cotton, and make little ties around your loop about every 8-12 inches or so, so the action of dyeing, heating, stirring, and general movement of your yarn throughout the process doesn't get it all knotted up. Then, stick your yarn in the sink with some lukewarm water and let it soak thoroughly.
Now, you mix up your dyes. Put on rubber gloves, please. Cover your counters with old shower curtain liners or other plastic. You can use baking soda to clean up, but it just helps to protect everything. Keep plenty of paper towels handy. I use plastic 16-oz water/iced-tea bottles. You want these to be highly concentrated with dye. Even though KA has citric acid already in it, I tend to add a little vinegar (about a 1/4-cup) to the bottle, pour in at least two, if not more, packets of KA in your preferred color, and fill about 2/3 with water. If you want more depth to your color (for example, Lemonade flavor is a very light yellow), add some drops of food color. Sometimes, I'll add a different food color to make a different color--I can add some red food color drops to pink lemonade, making it a strong, deep pink, and then mix in some orange KA to make a sort of coral/salmon color. Brown (Klaas tamarindo) is added to Berry Blue to make a nice teal. Berry Blue and Limeade make a nice aqua. Etc. etc. The point is to play and have fun making your concentrated colors. Cake icing (Wilton's brand, found at most craft stores) comes in a myriad of colors not found in KA: burgundy, copper, black, lavender, moss green, mauve, etc. For Wilton's icing dyes, I take a small jar, put in a teaspoon of gooey gel that is the icing dye, add hot water, replace the lid and shake up until it's completely dissolved, then pour it in a plastic water bottle, and add my vinegar/citric acid, and water.
You end up with multiple colors:
 |
| Some leftover colors from my last dyejob, plus a bunch of empties waiting to be filled |
 |
| Wilton's Leaf Green gel mixed with hot water |
 |
| Mango, a deep, rich orange |

Slowly pour your colors into your jars, crock pot, dish, whatever. If you want multiple colors for one yarn, or, in the case of the green-colored yarn below, a mix of the same family of hues, carefully pour your dye in sections, pressing each color into your yarn until it is saturated, and then add your other color in a different section.
 |
| A mix of yellows and light oranges in this crockpot |
 |
| Multiple greens |
 |
| Black Wilton's dye, which is basically every dye color together, "breaks" into different colors, almost looking purpleish |
To show you what happens before and after cooking, here is another example. The highly-concentrated dye liquid starts out dark, with your color. To this I would add my yarn:

Magic. The dye reacts with the acid and bonds with the protein in the yarn. The water goes from a deep color to CLEAR. Absolutely clear. I didn't get a great shot of clear water, but this one is close:

You can see the yarn that has been colored from that red. When the water is clear, you're basically done. Let the yarn cool, rinse it out in lukewarm water, squeeze gently, and let dry. The great thing about dyeing at home in Arizona or where I was in New Mexico this weekend is that the yarn dries fast in the sun.
|
| Just to show you again.... |


 |
| This is actually the black icing dye; the different dyes "broke" into a bunch of violet/purple hues |
 |
| Multiple green dyes |
 |
| Another example of black icing dye, left to soak longer |
Friday, August 12, 2011
Dutch Oven Cooking: Food Heaven
Last year, my husband hosted a Dutch-oven workshop through his job as public education manager for his agency. Dutch ovens are those big, cast-iron cooking pots with heavy lids that you can use in your own kitchen, or, in this case, your backyard, on a camping trip, or just for fun. You use hot charcoals in a calculated manner to obtain the proper heat to cook your bread, casserole, or desserts. The workshop was such a hit, he hosted another one this past weekend, which I attended.
The workshop instructors were this couple, a work colleague of my husband and his wife. Russ Richins has cooked with Dutch ovens for decades, and he and his wife Susan have a catering business, the Rockin RR Chuckwagon where they cook for large groups as well as hold workshops on Dutch oven cooking throughout the state and the Southwest. Their interest has led them to enter multiple Dutch oven cook-offs and contests as well. Due to these activities, between teaching, catering, and contesting, they have amassed dozens of Dutch ovens, cooking utensils, supplies, tables, etc. and they cart this heavy stuff with them everywhere. I believe they have a separate garage for all their supplies, as the volume easily surpasses your average wagon train of cowboys. Simply put, they know their stuff.
After an initial overview of what exactly is a Dutch oven and what you can do with them (practically anything that is cooked can be cooked in a Dutch oven, including roasting a turkey and making pizza), we ventured outside to the cooking tables, where, paired up, we each made some sort of bread dough. Given the time the bread needs to rise, be punched, then rise again, we had to get started on that. Bread dough is pretty simple, and every pair had a different recipe. I partnered with my friend Sherrie, and we made "Faux Braided Bread." Breads made by others included sourdough, honey wheat, cinnamon buns, and French.

After kneading the dough and covering it to let rise, we gathered together inside again to hear more about Dutch oven cooking--how to clean the ovens (NO SOAP!!), how to season them, tools to make your life easier as you handle hot coals, and how to calculate getting the exact number of charcoal briquettes to heat an oven to 325 degrees, 350, 400, etc. Yes, math is involved, but only whole numbers and only adding/subtracting; it's not tough. Adjustments are generally made for high-elevation cooking (like where we live). Handles to pick up Dutch oven lids must keep the lids balanced (otherwise coals fall into your food), and they must be long to keep your hands away from the heat. It's really quite an art. You can toss a bunch of coals on the top and bottom of your oven, but without calculating the right amount, you'll undercook or burn your food.
After the bread rose, we went out again and formed our bread into our loaves, and did what we needed to do to finish our bread. In our case, the Faux Braid, we rolled the dough into a long strip, added some strawberry jam down the middle, and cut these strips on each side, pulling them over each other to make a "faux" braid.
We then had to let our breads rise a second time for about 45 minutes, so at that point, the instructors got the coals going, and we made our second dish. Some pairs made desserts and some made casseroles/main dishes. We made a Beef and Green Chile Casserole, which included browned hamburger, green chile enchilada sauce, and a ton of cheese, all layered in between a bunch of tortillas. Sherrie added jalapeno chiles on one side for the adventurous participants who may want more heat to their green chile.
Then, the heat was really turned on. By now, it was about 2:00 p.m., we were starving, the coals were hot, and our ovens were packed with food ready to be cooked. We placed the proper amount of coals above and below our Dutch ovens, and while our casseroles, breads, and desserts cooked, we cleaned up and salivated over what was to come.


Ahh, and what came? Well, here is our cooked Beef and Green Chile Casserole:

And our Faux Braid Bread:

Other dishes prepared included an upside-down pizza, a hash-brown/sausage/cheese casserole, a pineapple side dish, a creamed corn bread side dish, a chicken enchilada pie, a "Cheeky Cherry" cake, and of course our many breads. Lots of cheese, lots of bread, lots of meat--DEEE-LISH!!!

We laid everything out on a long table, served it up, ate until we filled up like ticks, and then.....the clean up. Coals, ash, scraping the ovens, washing up, and helping break down all the equipment; it was good exercise after all that incredible food.
How much did we eat? Well, each pair made a complete casserole or dessert, plus two loaves of whatever bread. We each kept a loaf of our bread to split up and take home, and we served our other loaf to the group. Other than the bread, do you think we had leftovers???? Well, we did, but I have to say, we didn't have much! I think I brought home a couple spoonfuls of two desserts, a spoonful of the sausage/hashbrown dish, and a spoonful of the corn casserole. We pigged out, that's for sure.
Bruce and I are now thinking of having a Dutch oven party over Labor Day; we have a number of friends who occasionally cook with Dutch ovens, so why not? It's a blast, you made an incredible amount of incredible food--what's not to love?
In case you're interested, here are the recipes for our casserole and bread (bread recipe to be added at a later date when I locate it). Don't forget, you don't need a Dutch oven to cook these; they can be cooked in a casserole dish (for the casserole) and/or cookie sheet (for the bread):
Beef and Green Chile Casserole:
2 lbs browned ground beef
1 large can green enchilada sauce
12 corn tortillas
Shredded cheese
(add whatever you want; black beans, corn, tomatoes, onions)
Spoon and spread a small bit of enchilada sauce on the bottom of your 14" Dutch oven. Layer some of the corn tortillas at the bottom, then layer some of the ground beef, cheese, sauce. Repeat until gone; add shredded cheese on top. Bake at 325 degrees for 30-40 minutes, or until cheese is bubbly on top. We recommend using light or low-fat cheese as to not get that layer of oil that sometimes occurs with regular cheese.
Faux Braided Bread:
Coming soon-----
The workshop instructors were this couple, a work colleague of my husband and his wife. Russ Richins has cooked with Dutch ovens for decades, and he and his wife Susan have a catering business, the Rockin RR Chuckwagon where they cook for large groups as well as hold workshops on Dutch oven cooking throughout the state and the Southwest. Their interest has led them to enter multiple Dutch oven cook-offs and contests as well. Due to these activities, between teaching, catering, and contesting, they have amassed dozens of Dutch ovens, cooking utensils, supplies, tables, etc. and they cart this heavy stuff with them everywhere. I believe they have a separate garage for all their supplies, as the volume easily surpasses your average wagon train of cowboys. Simply put, they know their stuff.
After an initial overview of what exactly is a Dutch oven and what you can do with them (practically anything that is cooked can be cooked in a Dutch oven, including roasting a turkey and making pizza), we ventured outside to the cooking tables, where, paired up, we each made some sort of bread dough. Given the time the bread needs to rise, be punched, then rise again, we had to get started on that. Bread dough is pretty simple, and every pair had a different recipe. I partnered with my friend Sherrie, and we made "Faux Braided Bread." Breads made by others included sourdough, honey wheat, cinnamon buns, and French.

After kneading the dough and covering it to let rise, we gathered together inside again to hear more about Dutch oven cooking--how to clean the ovens (NO SOAP!!), how to season them, tools to make your life easier as you handle hot coals, and how to calculate getting the exact number of charcoal briquettes to heat an oven to 325 degrees, 350, 400, etc. Yes, math is involved, but only whole numbers and only adding/subtracting; it's not tough. Adjustments are generally made for high-elevation cooking (like where we live). Handles to pick up Dutch oven lids must keep the lids balanced (otherwise coals fall into your food), and they must be long to keep your hands away from the heat. It's really quite an art. You can toss a bunch of coals on the top and bottom of your oven, but without calculating the right amount, you'll undercook or burn your food.
After the bread rose, we went out again and formed our bread into our loaves, and did what we needed to do to finish our bread. In our case, the Faux Braid, we rolled the dough into a long strip, added some strawberry jam down the middle, and cut these strips on each side, pulling them over each other to make a "faux" braid.
 |
| Roll out, add jam, and slice edges at an angle |
 |
| "Braid" the strips over the top |
 |
| The finished Faux Braid prior to baking |
 |
| You can tell this hasn't been cooked yet; Sherrie isn't wearing gloves! |


Ahh, and what came? Well, here is our cooked Beef and Green Chile Casserole:

And our Faux Braid Bread:

Other dishes prepared included an upside-down pizza, a hash-brown/sausage/cheese casserole, a pineapple side dish, a creamed corn bread side dish, a chicken enchilada pie, a "Cheeky Cherry" cake, and of course our many breads. Lots of cheese, lots of bread, lots of meat--DEEE-LISH!!!

We laid everything out on a long table, served it up, ate until we filled up like ticks, and then.....the clean up. Coals, ash, scraping the ovens, washing up, and helping break down all the equipment; it was good exercise after all that incredible food.
How much did we eat? Well, each pair made a complete casserole or dessert, plus two loaves of whatever bread. We each kept a loaf of our bread to split up and take home, and we served our other loaf to the group. Other than the bread, do you think we had leftovers???? Well, we did, but I have to say, we didn't have much! I think I brought home a couple spoonfuls of two desserts, a spoonful of the sausage/hashbrown dish, and a spoonful of the corn casserole. We pigged out, that's for sure.
Bruce and I are now thinking of having a Dutch oven party over Labor Day; we have a number of friends who occasionally cook with Dutch ovens, so why not? It's a blast, you made an incredible amount of incredible food--what's not to love?
In case you're interested, here are the recipes for our casserole and bread (bread recipe to be added at a later date when I locate it). Don't forget, you don't need a Dutch oven to cook these; they can be cooked in a casserole dish (for the casserole) and/or cookie sheet (for the bread):
Beef and Green Chile Casserole:
2 lbs browned ground beef
1 large can green enchilada sauce
12 corn tortillas
Shredded cheese
(add whatever you want; black beans, corn, tomatoes, onions)
Spoon and spread a small bit of enchilada sauce on the bottom of your 14" Dutch oven. Layer some of the corn tortillas at the bottom, then layer some of the ground beef, cheese, sauce. Repeat until gone; add shredded cheese on top. Bake at 325 degrees for 30-40 minutes, or until cheese is bubbly on top. We recommend using light or low-fat cheese as to not get that layer of oil that sometimes occurs with regular cheese.
Faux Braided Bread:
Coming soon-----
Tuesday, August 2, 2011
Doing the Hummingbird Shuffle
Arizona is considered to be the "hummingbird capital" of the United States. That is certainly so in the southeastern part of the state where up to 15 species can be found, more than anywhere else in North America. Up here in the mountains, however, we have four "regular" species, and occasionally one or two more. At our house, we get all four: broad-tailed, which are the first to show up in spring and are breeders here; black-chinned and calliope, two species that show up off and on throughout the summer; and then...we have the rufous hummingbird (cue the "Psycho" shower scene music).
Prior to the 4th of July holiday, feeding hummingbirds is a gentle pastime; our sweet little broad-taileds, black-chinned, and calliope (the smallest of our North American hummingbirds) don't suck up too much nectar. A couple feeders on the back deck, maybe one on the front porch, need to be filled up about once a week. No problem. They follow the rules of kindergarten: share and share alike and treat others as you would want to be treated.
Then, on July 4th, the fireworks begin. I'm not talking about the chemically-engineered, rocket-launching light show. I'm talking rufous hummingbirds. Done breeding in the Pacific Northwest, western Canada, and Alaska, these fire-colored beasties are actually on their migration trip to southern Mexico for winter. They are, literally, our first sign of fall, a somber thought on the July 4th weekend. They also arrive en masse, and begin to completely disrupt our lives. Keeping our hummingbirds fed becomes a job for both morning and evening, every day. Not only that, rufous's are known for their territorial behavior. They "adopt" a feeder as their own, and dive-bomb every other hummingbird that dares to take a sip.
But it's not only which feeders are protected on a daily basis (and that changes every day, depending on the birds present and which feeders look unusually enticing for which overseer bird), it's the sheer numbers of hummingbirds that park themselves in our yard over the course of about two and a half months that literally rule our lives.
We get dozens. And dozens. Sometimes it feels like hundreds. We've had years where we can see dozens of hummingbirds using each feeder. And we put out something like 7 feeders. Each little hole on the feeder, or port, has a bird sipping from it, plus there are birds buzzing around each feeder waiting their turn. Sometimes there are two birds for each port. It's nuts.
 So this is my day. I wake up super early because we have to put the feeders out before first light. You can hear the birds start to wake up around 5 a.m. The "Angry Birds" app has nothing on these birds when they wake up and there is no nectar. We keep the feeders indoors overnight because we occasionally get bears in the yard, and they're attracted to not only our seed feeders, but to these nectar feeders as well. So every night, we take the feeders down and bring them indoors. In the morning, I schlep feeders out, all seven or possibly even eight or nine, which I fill every morning with nectar. Let's say 7 feeders at four cups of nectar per feeder; that equals 1.75 gallons. I then tromp back inside (and this is before my morning coffee), and make a couple more gallons of nectar. Please note that two gallons of nectar requires EIGHT CUPS of sugar. Every day, or at least just about every day. I then go to work.
I come home from work, greeted happily by my dog, but I can't even take the time to pet her, because many of the hummingbird feeders are empty, and the Angry Birds are making alot of noise. I toss my purse and work stuff on the counter and rush outside to figure out which feeders on that day are "guarded" by one little rufous hummer and still have nectar in them, and move those to where the empty feeders are, switching them out. I then put a little bit of nectar in the empty feeders, just enough to get them through the evening rush. After darkness, ah the blessed darkness, falls and the birds quiet down, I schlep the feeders back into the house and the cycle begins anew the next morning at 5:00. I call it "doing the hummingbird shuffle," as I feel like it's like a little dance, but it 's really more than that. It's like being forced at gunpoint to dance; you're sort of panic-stricken because you have dozens of feisty hummingbirds buzzing around complaining about the empty feeders, some need to be moved to certain spots, others need to be filled; and each day, the dance is slightly different.

So why do we do it? Well, despite the panic-stricken daily feeding shuffle, the time it takes to make two gallons of nectar each day, the space in the fridge taken up by gallon jugs of nectar, the empty replacement feeders either drying in the dish rack or strewn around our kitchen island making a mess, the sugar we have to buy in 25-lb bags at Costco, and the damn bees that sometimes take over a feeder (and are a totally different story), it is a marvel. Lazing over breakfast on the back deck while dozens upon dozens of hummingbirds go about their daily business, fighting, exploring your flowers, perching on the funniest places to lord over their protected feeder (tops of chairs; the top corner of a chain-link fence), doing their mating ritual dive-bombs, and more make our world just that much richer and fascinating. You gotta love hummingbirds. They are the toughest little creatures with the heart, and fierceness, of a lion. If they were our size, none of us would probably ever leave our houses out of abject fear.
By mid-September, they start getting a move on, and slowly the numbers decrease. Feeding is less of a frenzy, and gets back to a reasonable pace. It's almost a relief, but not quite. I miss them, and I know that winter is on its way, and I simply can not wait for next year's insanity.
I was able to finally get some videos uploaded. Here you go:
Prior to the 4th of July holiday, feeding hummingbirds is a gentle pastime; our sweet little broad-taileds, black-chinned, and calliope (the smallest of our North American hummingbirds) don't suck up too much nectar. A couple feeders on the back deck, maybe one on the front porch, need to be filled up about once a week. No problem. They follow the rules of kindergarten: share and share alike and treat others as you would want to be treated.
 |
| A sentry keeping watch over his feeder |
But it's not only which feeders are protected on a daily basis (and that changes every day, depending on the birds present and which feeders look unusually enticing for which overseer bird), it's the sheer numbers of hummingbirds that park themselves in our yard over the course of about two and a half months that literally rule our lives.
We get dozens. And dozens. Sometimes it feels like hundreds. We've had years where we can see dozens of hummingbirds using each feeder. And we put out something like 7 feeders. Each little hole on the feeder, or port, has a bird sipping from it, plus there are birds buzzing around each feeder waiting their turn. Sometimes there are two birds for each port. It's nuts.

I come home from work, greeted happily by my dog, but I can't even take the time to pet her, because many of the hummingbird feeders are empty, and the Angry Birds are making alot of noise. I toss my purse and work stuff on the counter and rush outside to figure out which feeders on that day are "guarded" by one little rufous hummer and still have nectar in them, and move those to where the empty feeders are, switching them out. I then put a little bit of nectar in the empty feeders, just enough to get them through the evening rush. After darkness, ah the blessed darkness, falls and the birds quiet down, I schlep the feeders back into the house and the cycle begins anew the next morning at 5:00. I call it "doing the hummingbird shuffle," as I feel like it's like a little dance, but it 's really more than that. It's like being forced at gunpoint to dance; you're sort of panic-stricken because you have dozens of feisty hummingbirds buzzing around complaining about the empty feeders, some need to be moved to certain spots, others need to be filled; and each day, the dance is slightly different.

 |
| Bees!!! What a pain!!!! |
By mid-September, they start getting a move on, and slowly the numbers decrease. Feeding is less of a frenzy, and gets back to a reasonable pace. It's almost a relief, but not quite. I miss them, and I know that winter is on its way, and I simply can not wait for next year's insanity.
I was able to finally get some videos uploaded. Here you go:
Subscribe to:
Posts (Atom)